Water is a wonderful thing for drinking, fishing, swimming ... and as a subject for photography. In its natural state water takes many forms. Sometimes it lies still and becomes a mirror to reflect the scenery beyond. But the most exciting times are when water is leaping and frolicking.
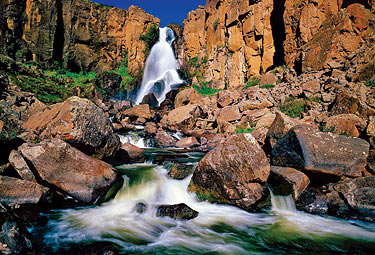 |
| The rushing waters at Clear Creek Falls near Creede, CO are captured in a still photograph made with a slow shutter speed to create the effect of motion. |
That poses a problem for the still photographer. The motion is an essential part of what fascinates us, but when we take a picture in the usual way using a fast shutter speed, the effect of motion is lost. The camera literally “freezes” the water. The result can look almost like hard, unyielding ice. The excitement is gone.
Fortunately, there are ways to make that water seem to come to life in a still photograph. The secret is to slow down the camera’s shutter speed, giving the water time to move and leave an impression of its motion during the exposure. The result can be like the picture shown here, taken at Clear Creek Falls in Colorado.
I made this photograph some years ago using a 4x5 inch view camera and film. I climbed down into the canyon below the falls, clambering over scattered boulders to find the viewpoint I wanted. If you Google the subject, you will find many pictures of this waterfall, but virtually all of them were taken from up above on the canyon rim. I have never seen another version like this one or some others I made at the same time.
Now here is how you can get pictures like this, making water seem to flow. The first requirement is to use a tripod, because you are going to set your camera for a long exposure. It should be strong enough to hold the camera completely still. If it is unsteady, you might suspend a bag of rocks from it to add weight.
Your first step to slow down the exposure is to set the ISO on your camera at the lowest number, usually somewhere around 100. That will not only produce a slower shutter speed, but also result in the best image quality.
Next, dial the f/stop on your lens to the smallest setting it allows, usually f/16 or f/22. That extends the exposure even more, giving that flowing water more time to move as the photograph is being taken.
But to get a strong effect of blurring and motion as in the example here will take even more. That photograph made with my view camera was probably shot at one or even two seconds. To take your photos that last step, use filters to further reduce the amount of light that reaches the lens. If you have a polarizer, place it on the lens and rotate it to get the maximum darkening effect. This will add about a stop and two-thirds to your exposure time.
By following all these steps, you can probably put some life into those streams of water, but to be truly effective try adding a neutral density (ND) filter to the mix. These are dark gray filters that come in various strengths. There are also variable versions that let you dial in the amount of darkening you want to achieve, up to eight or even ten stops of exposure. As an example, adding eight stops of time to your exposure, assuming it starts at one second without the filter, yields a time of about four minutes, so you probably don’t need to go to that extreme. A two or three stop ND filter (denoted as ND2 or ND4) is probably all you need for water photography. (In a future column I’ll discuss other ways to use ND filters.)
I should point out that the amount of exposure needed for a desired effect varies with the speed of the motion. Water that is moving very fast will yield a nice motion effect at a faster shutter speed than if the water is moving slowly. In the latter case you will need to use a longer exposure time. You can adjust the techniques described here to get the best exposure time for the situation.
Put it all together and you’re all set to bring moving water to life in your still photographs. Water in motion is a wonderful subject, and even here in the desert there are subjects to be found. Faux Falls near Ken’s Lake is one example, and the flowing waters of Mill Creek offer many potential subjects. And don’t forget those special moments when a flash flood creates temporary waterfalls in many places around the area.
_____________________________________________
David L. Brown is a landscape photographer who has led photo tours from his base in Moab since 2015, now as Printworks Photo Tours. His fine art prints can be seen at Printworks Gallery, 1105 S. Hwy. 191. He invites you to visit or call at 435-355-0121.
|