Capturing the Beauty of the Night Sky
by David L. Brown
The Moab area is one of the few remaining places in America where views of the night sky can still be appreciated. Many photographers come here to capture the beauty of the starry sky, and in particular the Milky Way.
As the patterns of the stars never change, it’s good to include some foreground subject for a pleasing composition. This can be a rock formation, a lake whose waters can reflect the stars, an old cabin or many other objects.
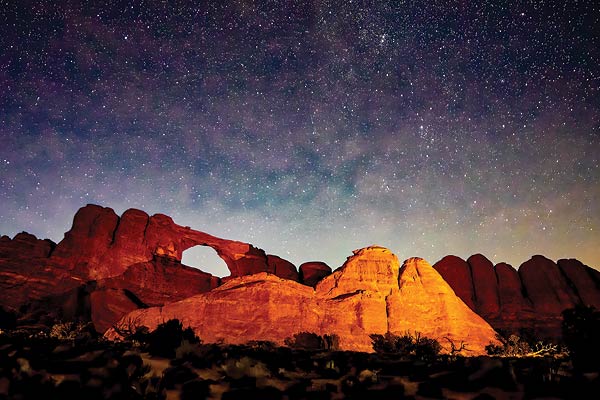
This photograph of Skyline Arch was made using low level lighting. A dimmable LED light was placed to each side to gently light up the feature as the camera captured the northern sky.
With their ability to expose at high sensitivity, today’s digital cameras are especially effective for capturing images of the night sky. This is done by adjusting the ISO setting, and while you might use an ISO of 100 or so during daylight, a setting as high as 6400 is required to expose an image of the starry sky.
In addition, you must have a fairly “fast” wide angle lens that offers at least f/2.8 or preferably F/2 or below. But these considerations are still not enough, for you must also set the camera’s shutter for an extended exposure time, typically up to 10 to 20 seconds. This requires the use of a tripod. Using longer focal length lenses limits the length of exposure time before stars begin to streak due to the Earth’s rotation.
If you want to try night sky photography, here’s a simple formula to follow. Use a wide-angle lens equivalent on a full-frame 35mm camera to 20mm or even wider. Use a lens opening of f/2.8, set the ISO at 6400 and the shutter at 20 seconds. If your camera allows, turn on the noise reduction features for high ISO settings and for long exposures. If you can open the lens wider, to f/2 or f/1.4, cut the exposure in half for each extra stop.
In this example, a moose has been combined in a composite image that captures the sense of the animal in its environment.
It’s also necessary to be sure the lens is focused correctly, and it may be difficult to do this in the dark. You can’t just turn the focus ring all the way to the far end of its range because most lenses allow you to focus beyond infinity. Autofocus won’t work in the dim light. A good practice is to focus the lens during daylight and make a note of the position. Add a sturdy tripod and you’re ready to capture a photograph of the stars.
There’s another factor to consider, and that is how to treat the foreground. If it is a moonless night without any light sources, objects will appear as dark silhouettes. If the Moon is bright it can result in pictures that look like overexposed daylight scenes. The sky will appear bright blue as if during the day, because the Moon’s light illuminates it with the reflected light of the Sun. Only when the Moon is a thin crescent can it make a very useful light source without overwhelming the dark sky.
Other options are to use the technique called “light painting,” using a flashlight to sweep light onto the subject during the exposure. Another method is called low level lighting. For this you need dimmable LED lights that can be set up to cast a very dim illumination onto the subject. When you expose for the night sky the objects will be lit up. An example is my picture of Skyline Arch looking toward the North Star, taken a few years ago and lit with lamps placed one on each side of the arch.
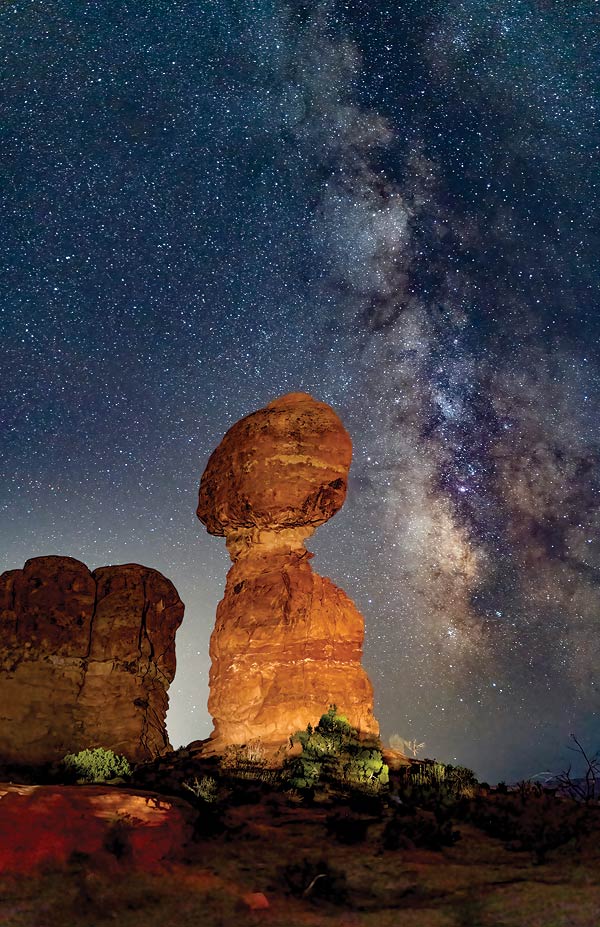
You should know that these lighting methods are now banned in Arches and Canyonlands, but there is yet another alternative and that is to rely on the extraneous light from passing cars or other people obliviously shining their flashlights around. I used this method to help my recent photo tour client Raghu Ravi make the picture of Balanced Rock shown here. I took him to a location where the headlights of approaching cars would briefly illuminate the subject. The trick was to wait until a car was approaching and make sure the camera shutter was open as the light flashed onto the subject.
In addition to the tips above, in order to safely move around in the dark, you’ll need to have a headlamp or handheld flashlight. The best kind will feature a red light setting, as this will not affect your night vision while also being less annoying to others.
Photographing at night is challenging but rewarding. Give it a try and you’ll find a new source of beauty for your camera.
David L. Brown is a Moab resident who has had thousands of his photographs published around the world. He has led photo tours here since 2015. He’s based at Moab Printworks, located at 1105 S. Hwy. 191 in Moab’s South Town Plaza. You can call him at 435-210-8158.